Forgive me for the click-bait summary. Well, what I said there is not entirely false.
Its been more than just more than a year since I re-started my electronics hobby (since some 16 years ago, I guess). Around that time (1 year, not 16 years) an oldish DIY project article on the Internet clued me in that caller ID was transmitted as DTMF tones (in India). It was true, I even could read the info with CM8870. Within a a couple of months I noticed that the DTMF business was not working but my phone was displaying the info – which means the exchange did not disable the feature. This meant they switched the signaling. Couple of experiments with an opamp and DSO proved it – they were using FSK (wiki)
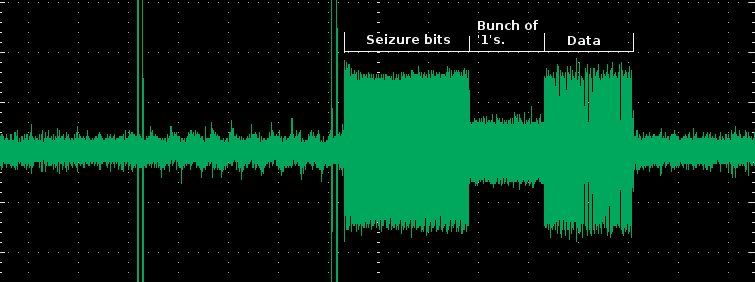
The 3 portions of the CLIP signaling.
Then came the futile attempt to demodulate it using a CD4046 (PLL). Lot of trial and error but could not get clean bits out of it – something to do with lousy low pass filter design. After some googling I came to the standalone decoder chip HT9032. It does the demodulation and gives us plain logic output. There are two variants of this chip, the ‘C’ and ‘D’ – the D version is the smaller one with 8pins but does not offer ring detection (that has to be done separately).
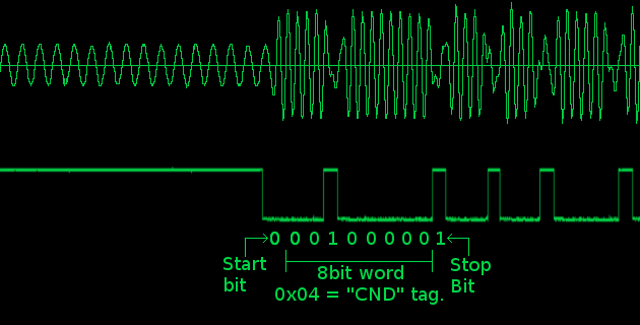
Portion of the FSK signal (at the boundary of the stretch of ‘1’s and the data)
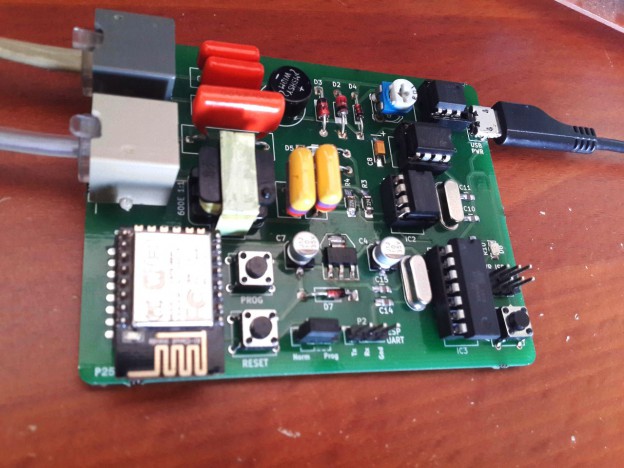
Hardware
There are four blocks in the circuit

There is always a block diagram !!! (POTS = telephone line)
- FSK Demodulator which converts the FSK signal to stream of UART like bits
- Ring detector which give a logic high when the high voltage ring signal arrives.
- Caller ID message (CND) Parser which pulls out the data fields from frame of data
- Wifi interface that dispatches the info for fun and profit.
The Telephone decoupling
Transformer’s revenge. I had pulled out a fallen transformer (from an ADSL splitter for first experiment – its not a 1:1 transformer).
The telephone lines (called TIP and RING) don’t have ground reference so we can’t really stick it on to one of our chips (unless it knows what its doing). One usually has to use a 1:1 transformer with (600 ohm facing the PSTN line) to get the signal – I’ve used one of those to get the audio signal for HT9032 to devour. The ring detection is separated using an opto-coupler (4N35, its a ‘jelly-bean’ variety I think).
I once tried not using the 1:1 transformer and instead using just capacitors – all sort of noise from micro-controllers went back up the line – so, that’s not a good way to do it.
Key interconnects
- The ring detector output (from the LM393) goes to the ATTiny84 PA1 (Port A, bit D1)
- Demodulated logic stream from HT9032 goes to ATTiny84 PA2.
- The unpacked number info (or error) goes from ATTiny’s PA0 to the UART0 RX of the ESP8266 module.
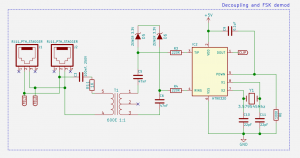
A portion of the schematic. Click the pic for the full schematic.
There is a jumper on the ESP’s UART0 RX line to select between ESP’s serial programming input and the ATTiny’s output.
Software CND parsing
The message frame that comes from the demodulator mostly carries only one type of message the ‘CND’ (Caller Number Delivery). Telephone company may provide other kind of services for e.g. CNAM (not seen any of those). I used an Arduino™ clone in the first prototype to parse the message and send it for further processing. I later used an ATTiny84 micro-controller. The parser is not stable as the logic stream is not rock solid in pulse width as a typical UART signal (although the framing is same). I’ve added lot of fuzzy guess work to figure out the bits (You can check out the source code and suffer).
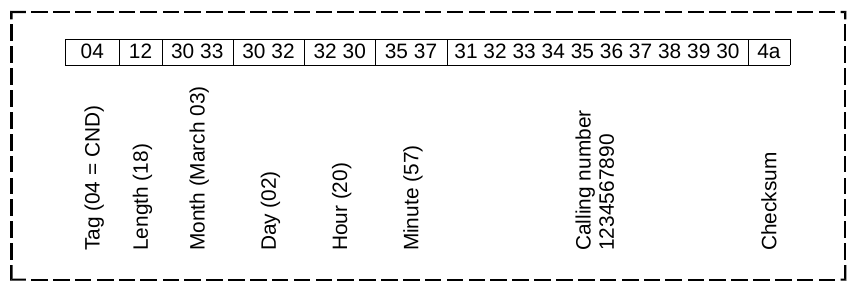
CND Message. The message bytes are in hex – the date, time and number are ASCII text. Summing up all the bytes including the checksum should have remainder of 0 when divided by 256 (Which I don’t do in the code).
Forwarding over WiFi
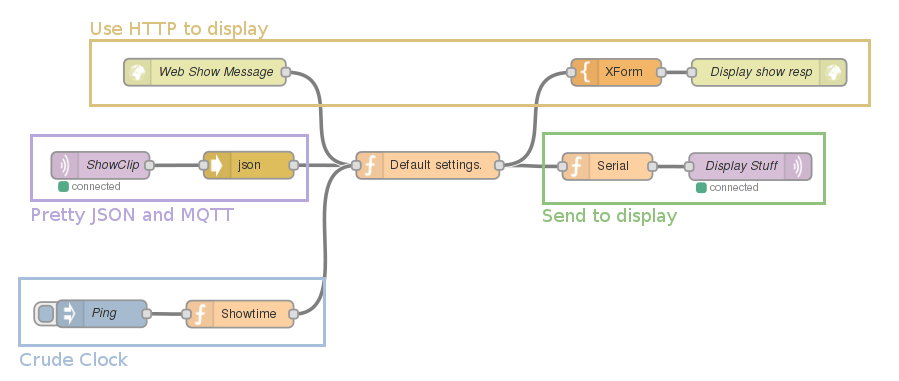
The star of 2015 ESP8266 does the job of forwarding the CLIP info. I’ve continued the use of Raspberry-Pi and Node-Red + mosquitto combination I mentioned in my earlier post about dot-matrix display. This time the ESP “publishes” the information to (or ‘as’ ?) the topic /clipdev on the MQTT agent running on the Raspberry Pi. A sample flow available at aniline/clip_display_flow.json does that and sends it to the dot-matrix display. If you want to try it you can copy the JSON text and paste it in new flow sheet on the NodeRed UI. After that you can select the portion that grabs the CLIP info and save it as a sub-flow or attach other elements to it.
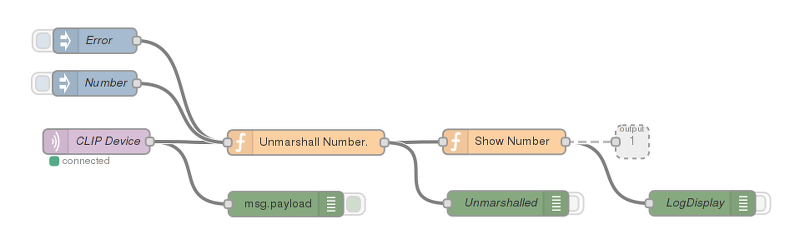
Portion of the CLIP grabbing flow. Why make a single function when you could have fun with all those boxes.
Some fixing needed, what next, etc.
- Reliability (read usability): The de-modulator spew out wrong bits occasionally.
- Power supply regulation is non-existent on the existing prototype and right now I run it using a mobile phone charger with a USB micro-B connector at its end.
- There are lots of ‘defensive’ / conservative telephone decoupling. It could lose some zener diodes and capacitors.
This happens to be my first more involved use of Kicad. Had made a couple of symbols, foot-prints and 3D models for this. They are available on github (links below).
Links
- Hardware files (Kicad) : aniline/wifi_pstn_cid
- Firmware files (AVR and ESP8266): aniline/wifi_pstn_cid_fw
- My basket of kicad schematic symbols (not too many, I guess I’ll adding to it): aniline/akn-kicad-libs
- Related foot prints: aniline/akn_transformers.pretty, aniline/akn_misc.pretty
- And 3D models (sometimes I think this is as equally fun as the rest of the project): aniline/akn.3dshapes
There are a bunch of nice articles on various methods of interfacing here:
- http://www.epanorama.net/circuits/teleinterface.html
- Interfacing Audio and POTS, Dennis Bohn, Rane Corp.
- DTMF CLIP project (CC Dharmani’ blog): Design Caller ID using DTMF decoder MT8870
- Talks of other FSK messages: Caller ID Basics by Michael W. Slawson